Dressage Through the Movements: Tips for Riding Through a Dressage Test
By National Examiners Anne Moss and Nancy Grout
These tips for riding a test will help you with each movement.
For anyone striving to do well in dressage, these tips can help you be ready to ride a solid test for your certification. It is easy to show quality work to the “standard” in a warm-up arena, but the real challenge is to put a test together with accuracy and harmony in a dressage arena. This takes practice—practice at home and practice in the show ring—until you can perform a solid test. Try not to come to a certification without riding the test in a show, or, better yet, lots of shows. Horse shows are easier than certifications; they are a test of your training.
And before climbing in the saddle, you can learn by watching videos from different angles and/or looking at diagrams of each movement. Both let you see the figures in the space.
Memorizing the Dressage Test
First, you want to understand the purpose of the test, and this can be found at the top of each dressage test sheet. Read the directives for each figure and movement to know what the judge is evaluating, and look at the movements and see which have a coefficient of 2 (x2), meaning they are more important movements and scored double. You will want to ensure you practice those movements with special care to get the best score.
Before you memorize a test, you need to have some sort of “arena” set up. Set up an arena (with letters) on a lawn, rug, or a barn aisle. The 12 standard dressage arena markers are (as starting at 6 o’clock going clockwise):
- For a 60 x 20 meter arena, A-K-V-E-S-H-C-M-R-B-P-F with “invisible letters” of D-L-X-I-G up from A to C.
- For a smaller dressage arena, at 40 x 20 meters, the marked letters are A-K-E-H-C-M-B-F, with “invisible letters” D-X-G up from A to C. (See the illustration.)
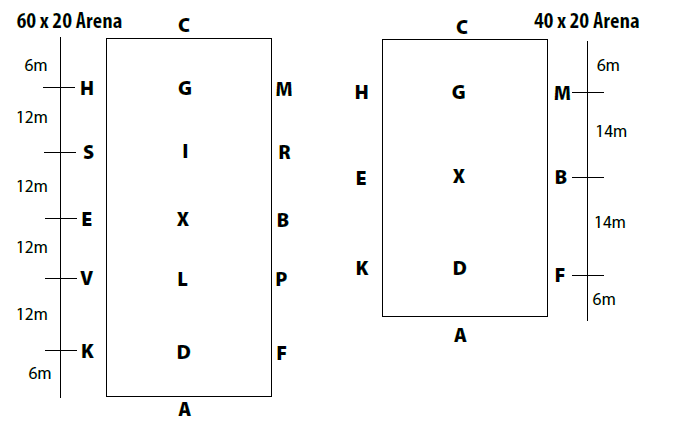
“mock” arenas in order to memorize your test. Illustration by The United States Pony Clubs.
Here are a few methods to help memorize any test.
- Walk the test while saying the movement aloud. For example, “Enter A at working walk,” or “Enter and walk down the centerline. Then X-Halt and salute,” which translates to halting at X so you can practice your salute.
- Write the aids and training movements you would do for the entire test. For example, “Come off right rein-—stiff direction, keep my left rein near my horse’s withers and my left shoulder back through the turn so he does not overbend in the neck, soften right hand, support…”
- Draw the test’s movements as you recite the test. Mark specific lines, such as a dotted line for a trot and a short line for a lengthened trot; or use first letters for each gait, such as “T” for trot, LT for “lengthen trot.”
- Finger draw the test’s movements in a pan of uncooked rice. Place rice in a cookie sheet enough to cover the sheet bottom. Using your index finger [as a pen/pencil], draw the movements as you recite the test. For example, place your index finger into the rice as you draw a straight line to X while saying, “Enter working trot.” Then stop moving your finger at X while saying, “X, halt and salute.”
- Test yourself by saying the test out loud with loud music playing or with other distractions.
Setting Up to Practice Your Dressage Test
At home, you’ll want to be able to test in a dressage arena, which is usually 60 x 20 meters. Dressage boards are 4 meters long, and knowing the length helps with the geometry of the movements.
Elements of the Dressage Test
ENTRANCE: Enter the centerline from the horse’s stiff side for a straighter entrance. When riding multiple tests in a day/weekend, enter the centerline from the same direction you will turn at C. For example, enter off the left rein for tests that indicate a left turn at C. If you are using a competitor bridle number, put the number on the same side of the headstall that you will be turning at C. Don’t forget to look the judge in the eye. Ride forward down the centerline. Remember, the quality of the gait is judged along with the halt and the transitions in and out of the halt.
THE CENTERLINE: Always practice the centerline as it is the first and last impression you will make on the judges. In addition, several movements are from the centerline. As you practice riding down the centerline, picture an imaginary line bisecting your horse. He should stay right on the centerline. At G, ride shoulder-fore, which is a lateral movement where the horse puts more weight on the hind legs as he steps actively under his body. This helps him prepare for the bend in the turn at C and at the corner. Use the outside aids to define the turn and keep your horse from falling off the centerline.
THE SALUTE: The salute is five steps, although if you are carrying a whip, it consists of six steps. Reins should be in the left hand, and the whip’s top, if one is carried, should be tucked under the left hand’s thumb. The fingers and arm of the right arm should be stretched out and pointed down at a 45-degree angle. Do not place the arm behind the right thigh, because if the horse turns his head to the right, then the judge cannot see the right arm. Nod your head down; do not bow at the chest. Your right hand will retake the reins and get contact back, and you will then strike off to the directed gait at the trot or canter.
THE HALT: The halt at X needs to be immobile for three seconds, as the salute above will take that amount of time. Do not “fix” an unbalanced halt. The score will drop if the horse moves any feet or backs after the initial halt. Fix it by riding a better-balanced transition next time.
CORNERS: To ride a better corner, half-halt before and after to help balance the horse. Good corners are the beginning of a good next movement or figure. Use the corner to set up the next move—every corner every time. Go deep enough into the corner so that you can begin the next movement or figure as your body passes the corner letter at the letter. A good corner can add a half a point to the movement score, which can add up to a lot of points at the end of the test.
DIAGONAL LINES: Aim the horse a stride before the letter to be able to execute a second movement at that letter. For example, if moving from M to X to K, trot the diagonal, and at K, canter on the left lead.
LEG-YIELDS: During a leg-yield, keep your shoulders level and facing the short side. Ride leg-yields and half-pass exactly from letter to letter to show correct crossing and lateral balance.
SHOULDER-FORE: This is useful to set up a diagonal or to help straighten haunches leading down the straight side of the arena.
Riding Better Circles
If riding a 20-meter circle, if the size is wrong, it is better to make an 18-meter circle than a 22-meter circle (i.e., smaller is better than too big). Large figures show a lack of control of the horse’s balance and direction and usually result in the loss of a point. If the figure is too small but well executed, the score may not be lowered.
It is easy to show quality work to the “standard” in a warm-up arena, but the real challenge is to put a test together with accuracy and harmony in a dressage arena. This takes practice—practice at home and practice in the show ring—until you can perform a solid test.
Practice circle geometry with cones by placing a pair to go through, 4 feet apart at each straight stride on the circle—A side, X side, etc. Think about the math. For example, if trotting a 20-meter circle equals 24 strides, then each quarter of that circle rides six strides. If trotting a 10-meter circle takes 16 strides, then each quarter of that circle rides four strides. A volte circle of 12 strides might then equal six to eight meters. This can also be applied to a canter circle. For instance, if you are cantering a 20-meter circle, each quarter would be six strides to total 24 strides.
Improving Your Horse’s Gaits in Dressage
The judge will evaluate the quality of your horse’s first movement, then the quality of training, and the execution of movements and figures. So, make sure you are riding to show off your horse’s scope with ground-covering strides to show engagement and swing though the topline to get the best score for correct training.
Is the medium walk tracking up, meaning that the hind leg hoof should step fully into the hoofprint left by the front leg? Yes, it must. The free walk should be a march and show clear overtracking with stretch through the topline, which is when the hind feet overstep, touching the ground clearly in front of the hoof prints of the fore feet. The working trot should also track up. The canter must cover ground with “jump.”
Transitions should be shown riding forward from one gait to the next without shortening the steps; this is not easy but a real test of your coordinated aids and the quality of balance of the horse.
Keep a light contact in the trot stretchy circle, and keep the leg on to help the horse maintain the bend and lift through the ribcage and abs to swing in the back. Read the directive for this—the nose should stretch down to the level of the chest or lower for a satisfactory score.
The stretchy trot circle and free walk stretch through the topline are real indicators of your horse using his back correctly. Collected gaits are created by engaging the hindquarters and coordinating the aids with half halts to help the horse attain a more uphill balance. (Some people confuse collection with shortening the steps, which actually constrains the movement and decreases the length and quality of the gaits.)
At the Test
It’s important to bring a horse to your test that can perform at the level of the certification. If the horse is too green for the level you are testing, it will be a challenge for you to meet the standard.
Further Reading on Riding Dressage
- More on collection
- More on the pyramid of training (aka, the training scale)
- Observe the forward riding and quality of gaits with Laura Graves riding her Grand Prix mount Verdades
- The USDF’s 2023 “On the Levels” video series
This article about improving your dressage riding was originally published in the Fall/Winter 2022 issue of Discover USPC magazine. Read more content from that issue.
USPC National Office
The United States Pony Clubs, Inc. (USPC or Pony Club) is the largest equestrian educational organization in North America. Started in 1954, the organization has developed curriculum that teaches safe riding skills and the care of horses through mounted and unmounted lessons. Through Pony Club, members have fun with horses and make lifelong friends while they develop skills, habits, and values that extend well beyond the barn and last a lifetime. Many members apply what they have learned in the USPC program successfully in their careers, educational and volunteer opportunities, and other life pursuits.

You May Also Like

Member Spotlight: Kate Wood

Member Spotlight: Anna Erickson
